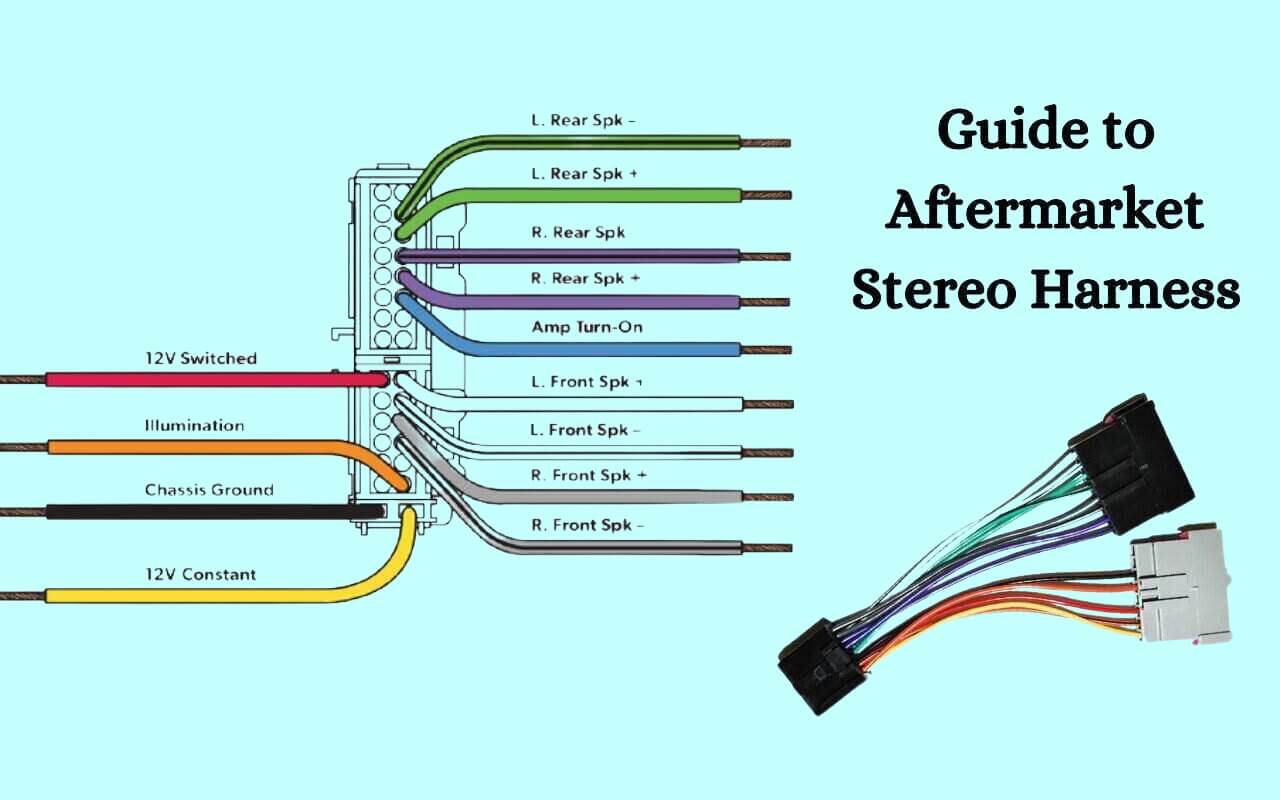
Decode Aftermarket Radio Wiring Diagram to Install Your New Radio
Have you ever wanted to upgrade the factory radio in your car with a shiny new touch screen stereo? Maybe you’re an enthusiast looking to enhance the audio system in your favorite ride. Or perhaps you just want modern features like Bluetooth, navigation and USB ports.
Replacing the head unit in a vehicle is one of the most popular upgrades among car owners today. But while the idea seems simple enough, the actual installation can get complex when you open up the dash and find a nest of wires staring back at you.
So how do you know what all those colored wires are for? And will your new aftermarket car stereo even connect properly in place of the old one?
In this guide, we’ll show you everything you need to identify those mysterious wires behind your car’s radio, and properly connect an aftermarket head unit for seamless operation.
We’ll provide labeled wiring diagrams, explain what the wire colors and functions mean, show you where to locate your car’s wiring color codes, decide if you need a wiring harness adapter, teach you to bypass any factory amp, cover what the wire colors on your new head unit are for, detail how to connect your car speakers, give a 10-step installation tutorial, and answer frequently asked troubleshooting questions – so you can upgrade your rides’ radio and audio system like a pro.
Let’s get started!
What is an aftermarket radio wiring diagram exactly?
It’s a schematic drawing showing colored wires and connector pins between the factory car stereo, harnesses, and new replacement head unit. Aftermarket wiring diagrams identify all wire colors and pinouts so installers can properly match functions and terminals when upgrading the radio. We’ll decode diagrams and detail how to use them for trouble-free DIY car stereo installation.
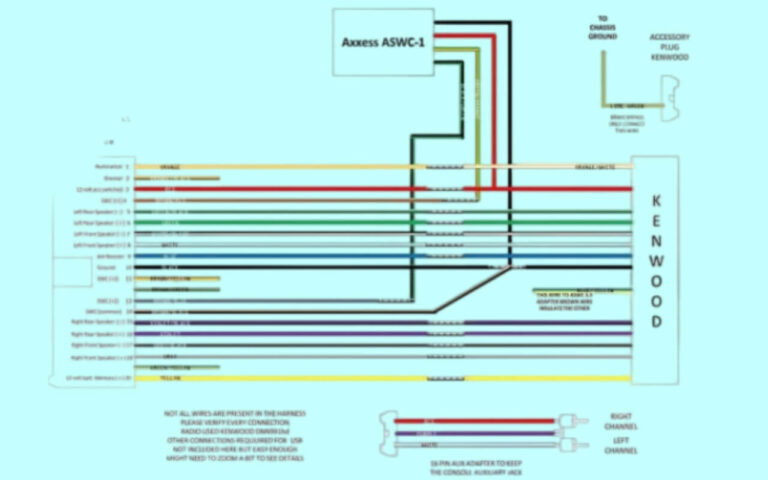
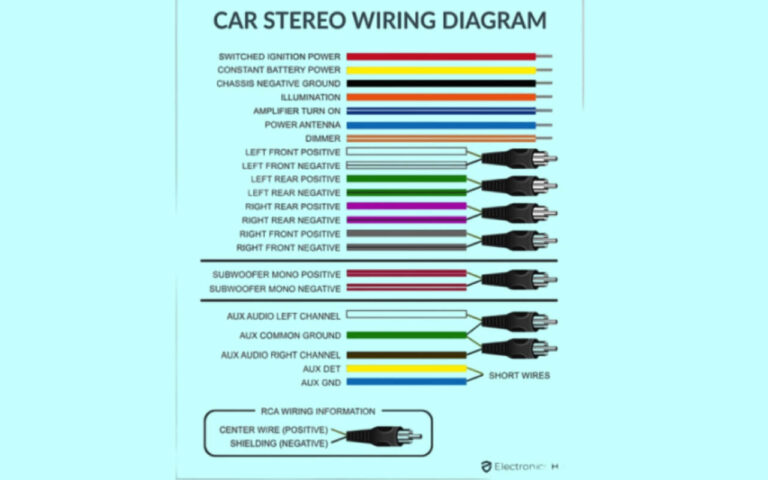
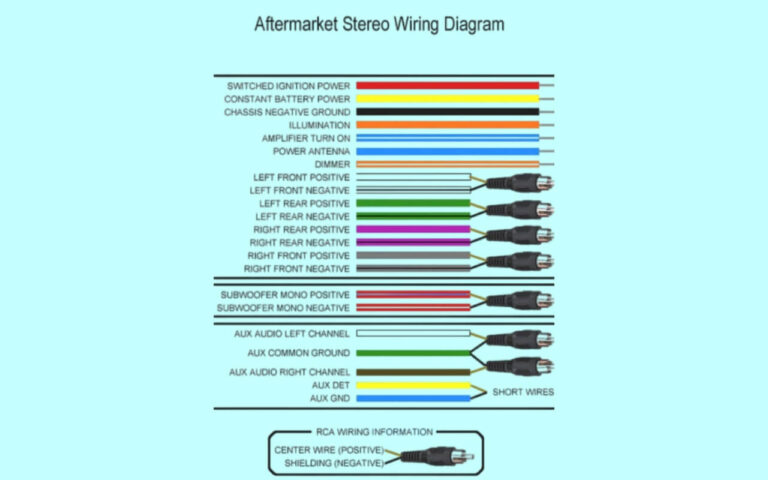
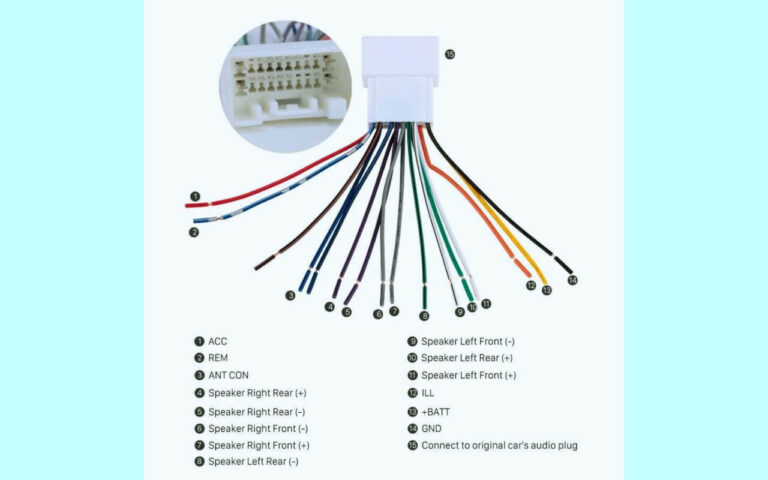
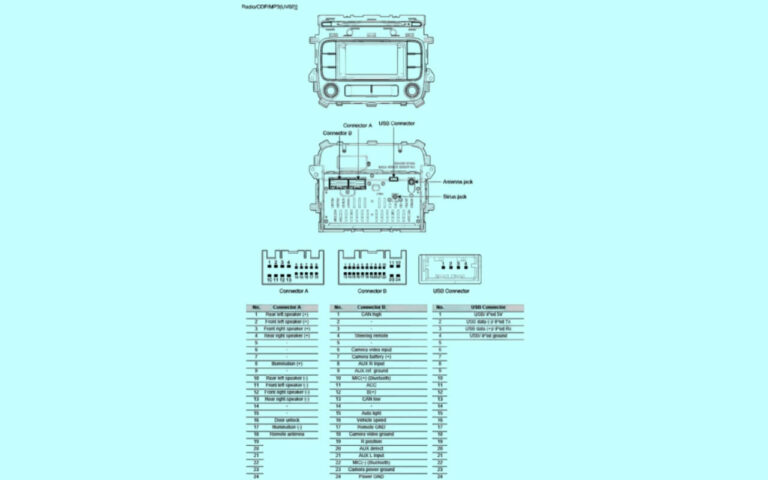
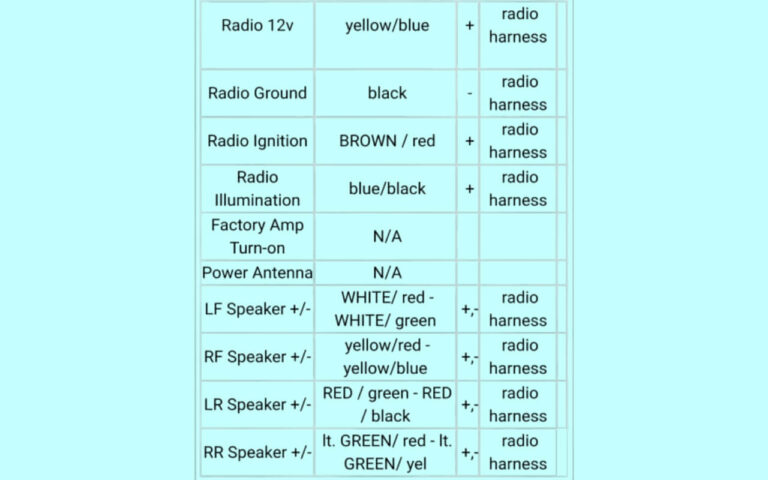
Aftermarket Radio Wiring Diagrams
Diagram 1:
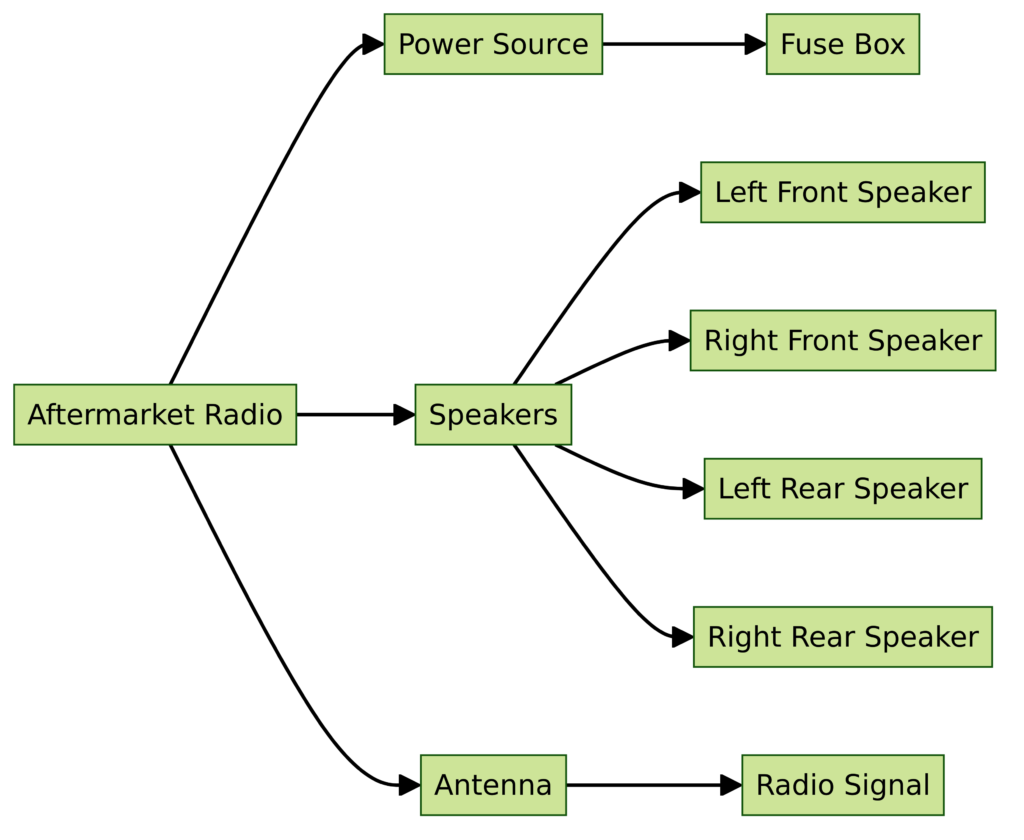
Diagram 2:
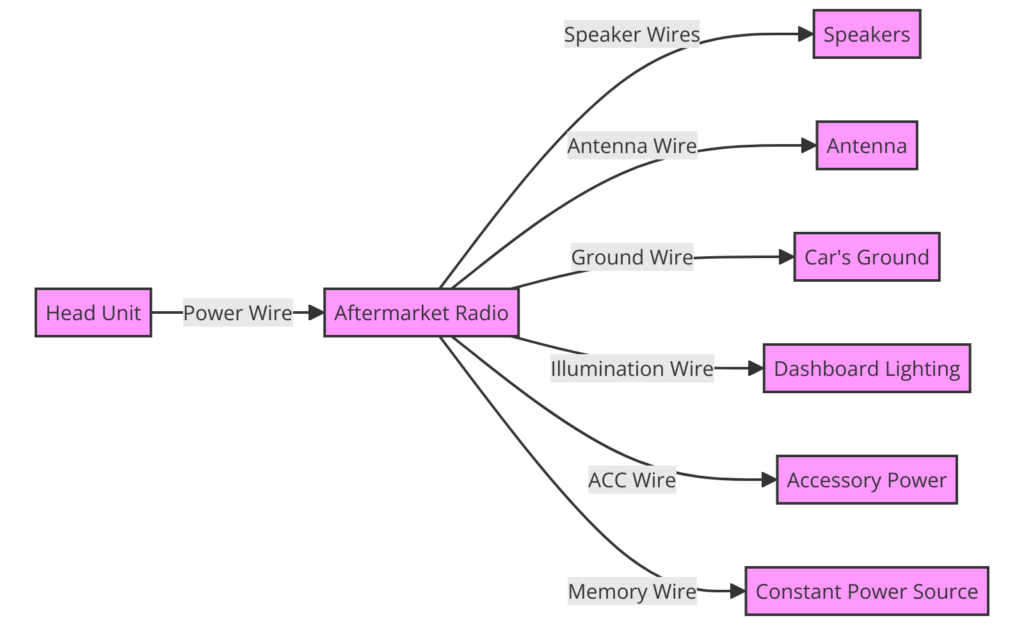
Diagram 3:
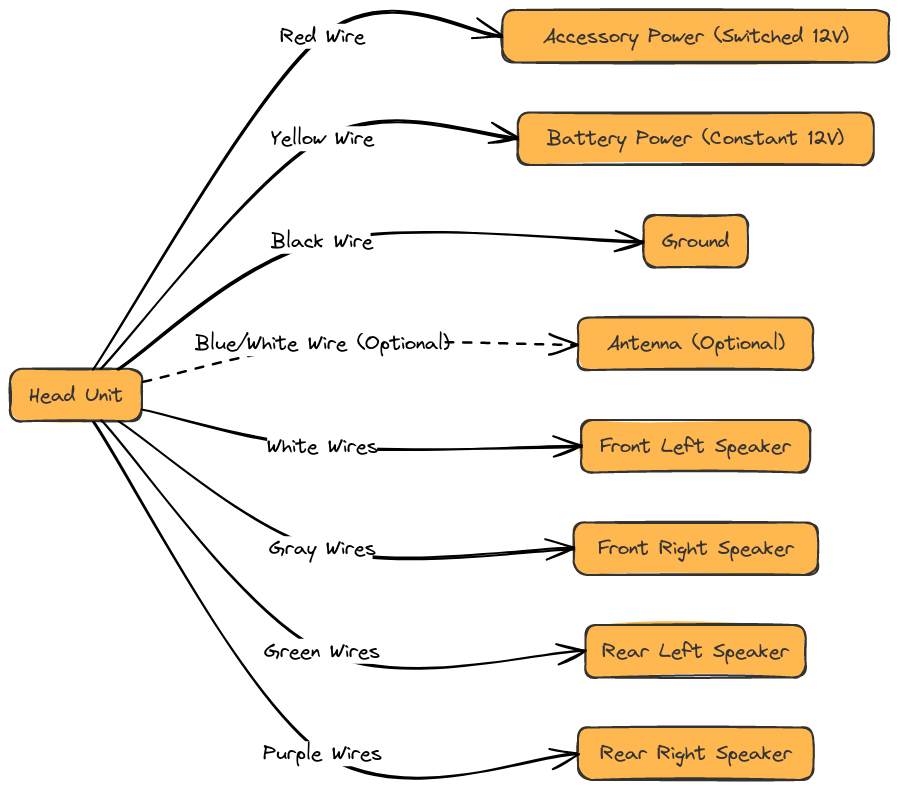
Diagram 4:
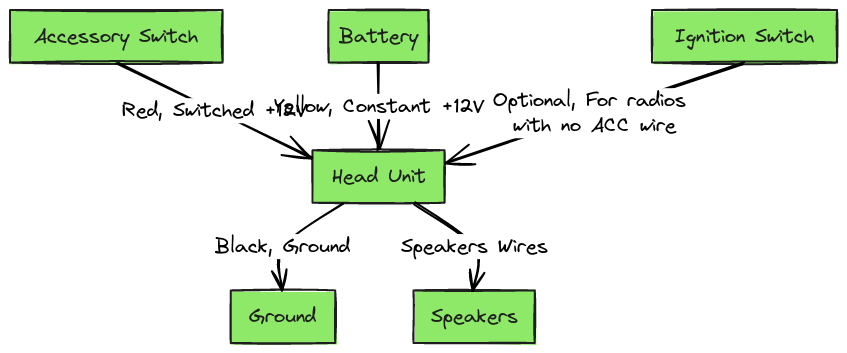
Diagram 5:
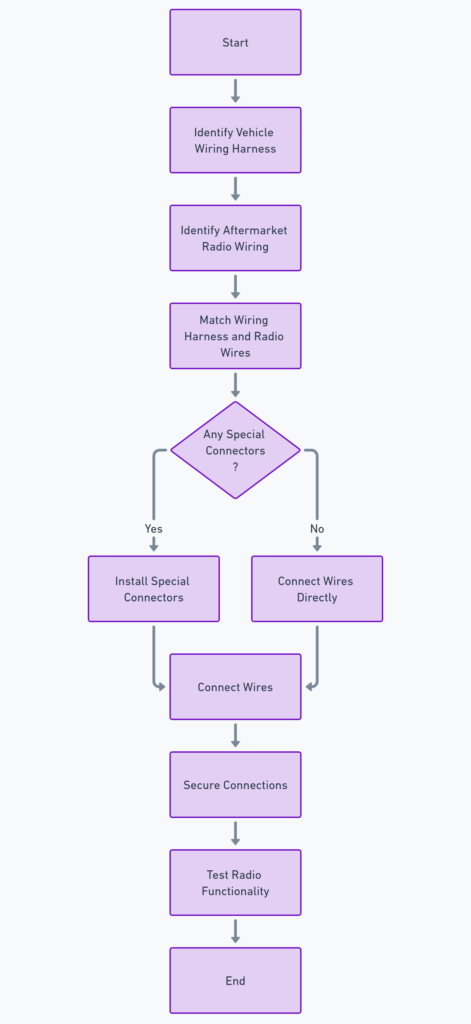
What Are the Different Car Stereo Wire Colors For?
The first mystery you’ll confront is identifying what all those different wires behind your car’s radio are actually supposed to do.
Car stereo wiring consists of 4 main components:
- Power wires – Supply constant and switched power to the head unit
- Speaker wires – Carry audio signals from the radio to connect speakers
- Accessory wires – Conduct lower current signals like antenna, illumination, etc.
- Ground wire – Provides an earth ground connection back to the vehicle
You’ll also encounter wiring harnesses which neaten all those loose colored wires into organized connector groups. We’ll get into those shortly.
But first, let’s demystify what all that multicolored spaghetti behind the dash is for:
Power Wires
These supply positive and negative power to run your stereo.
- Yellow – Constant 12V power – Always “hot” even when ignition is off
- Red – Switched Ignition power – On when ignition key is turned on
- Black – Vehicle ground – Properly grounds the head unit to the car’s metal frame
Speaker Wires
Carry left and right audio channels to external amplifiers or directly to speakers. Common configurations are:
- White – Front Left + signal
- White/Black – Front Left – signal
- Gray – Front Right + signal
- Gray/Black – Front Right – signal
- Green – Rear Left + signal
- Green/Black – Rear Left – signal
- Purple – Rear Right + signal
- Purple/Black – Rear Right – signal
Accessory Wires
Conduct lower power signals for external interfaces:
- Blue/White – Power Antenna Turn-On lead
- Blue – Amp Turn-On lead
- Orange – Illumination wire for dimming radio display
- Brown – Mute wire for muting audio when reversing
The Ground Wire
Provides an essential earth ground connection from the stereo back to the vehicle’s metal frame. This completes the circuit for proper operation.
- Black – Attaches head unit to common vehicle grounding point
So in summary, those wire colors help the aftermarket radio function, light up, communicate with amplifiers, mute audio when needed, control external devices like power antennas – and critically, deliver power and signals to run everything.
Alright, now that we know what those wires are for – how do we connect them? This is where wiring harnesses come in.
Why Do You Need A Wiring Harness for a New Car Stereo?
Behind the factory radio, you’ll notice a wiring harness which neatly bundles all the loose wire colors into a single connector. This mates perfectly to the back of the stock head unit for quick installation at the assembly plant.
But when upgrading to an aftermarket car stereo, how do you connect those existing wires to a new radio that expects a different connector?
That’s where wiring harness adapters come in. These bridge between your car’s unique connector, and whatever plug is required on the back of your new head unit.
Harness adapters neatly bundle all the factory speaker, power, ground and accessory wires into one easy plug. This avoids needing to manually splice each wire separately.
Simply plug the male side into your car’s wiring connector (like it was made for the factory stereo)…and connect the female side into the new head unit. This neatly adapts between connectors that otherwise wouldn’t mate together.
We’ll cover more about finding a proper wiring harness adapter shortly. But first, it helps to see what sort of vital info those wires contain…
How to Read an Aftermarket Car Stereo Wiring Diagram
If connecting random wires blindly, you’re gonna have a bad time.
That’s where wiring diagrams come in handy!
A good diagram shows exactly how all those colored wires are routed between connectors, with values labeled. This lets you visually match up pins between the factory harness and aftermarket radio plugs.
Here is how to make sense of car stereo wiring diagrams:
- Wires are shown with their color-codes written inside
- Diagrams display wires end-on-end for easy viewing
- Connectors are shown with pin-numbers for identification
- Values are called out with exactly what signal or purpose each carries
- Ground wires are visually emphasized for quick ID
Wiring diagrams let you match up those cryptic wires between old and new head units visually – avoiding trial-and-error guesswork which could damage radios during installation.
How to Find Your Car’s Radio Wiring Color Codes
But where do you get the correct wiring diagrams showing wire colors and pinouts for your specific ride?
For the most accurate info, check:
- Factory Service Manuals – contain detailed wiring schematics covering the exact year, make and model vehicle. Available printed or digitally.
- Online Forums – Owner’s forums often have members kindly sharing wiring details for common head unit swaps. But double check info applies to your exact vehicle.
- OEM Radio Plugs – Sometimes the pinout with color-codes is actually printed on the factory harness plug itself! Check existing wiring in dash.
Here is an example pinout label:

Note color-coded wires are labeled right on the factory harness plug
Triple checking at least two sources helps avoid blindly trusting some random forum post. Factory manuals provide verified diagrams from the manufacturer.
Alright, let’s now move onto…
What is a Radio Wiring Harness Adapter and When Do You Need One?
As covered earlier, a wiring harness adapter neatly adapts between your car’s factory head unit plug, and the connector on your new aftermarket stereo.
Here is when you need a harness adapter:
- Your vehicle has a single harness plug at the back of the factory radio. So there is no loose wiring to match manually.
- The new head unit you choose has a different connector than your car. Such as being made by Pioneer, Sony, Kenwood etc.
- You don’t want to cut off the factory connector and manually splice all wires over.
- There are steering wheel controls, OnStar modules, or amplifiers connected through the factory wiring which need to function after the upgrade.
Basically if your car doesn’t have loose harness wires to match colors manually, adapters are essential to installing a new head unit. And avoiding damaging splices.
Harness adapters are specific to car makes and models. So be sure to order the proper one matching your vehicle and new head unit brand. Manufacturers like Metra and Scosche are reputable. Retain factory connectors whenever possible.
Let’s move onto…
How to Bypass A Car’s Factory Amp for Adding an Aftermarket Stereo
Modern car audio systems often have a factory amplifier powering the speakers. When upgrading the head unit, this existing amp needs to be considered.
Factory amps take speaker-level inputs from the wiring harness…then amplify and process the signals to feed specific speakers. This achieves better sound quality than a head unit alone can provide.
So how do you add an aftermarket car stereo while retaining the stock amp?
- To bypass a factory amp: Use a wiring harness adapter that extracts audio signals from the car’s amplifier, and feeds them to RCA line-level inputs on the aftermarket head unit. This avoids needing to hack into the amp circuitry itself.
- To replace a factory amp completely: Use a harness adapter where the new head unit’s amplified speaker-level outputs instead drive the speakers directly. Just ensure the radio provides enough clean wattage to power all car speakers sufficiently. Re-use factory speaker wires.
- To add an external amp: Use line-out RCA adapters from the new head unit to feed signals to RCA inputs on new amps. This bridges factory wiring through to cleaner external amplification.
So in summary: Use harness adapters to intelligently bypass or replace car factory amps when adding your new touchscreen stereo! Let’s now move onto…
What Do the Wire Colors on an Aftermarket Car Stereo Mean?
Okay, so we’ve covered the vehicle side. But what about the rainbow wired mess on the back of your fancy new aftermarket head unit? What do those colors signify?
Fortunately aftermarket car stereo manufacturers adhere to a reasonably consistent color coding convention across brands:
- Red – Switched +12V Power
- Yellow – Constant Battery +12V Power
- Black – Ground
- Blue – Antenna Turn On Lead
- Orange – Illumination Wire
- White – Front Left + Speaker
- White/Black – Front Left – Speaker
- Gray – Front Right + Speaker
- Gray/Black – Front Right – Speaker
- Green – Rear Left + Speaker
- Green/Black – Rear Left – Speaker
- Purple – Rear Right + Speaker
- Purple/Black – Rear Right – Speaker
This makes installation easier when replacing any factory stereo. Just match wires colors according to purpose rather than specific brand.
Next let’s examine connecting speakers…
How to Connect Front and Rear Speakers to an Aftermarket Car Stereo
Upgrading the dash radio is only step one. To complete your new custom car audio system, external speakers need to be connected to the replacement head unit.
Depending on where the existing speakers are installed in the vehicle and how much amplification power is desired, there are a few options:
- If retaining factory speakers: Use an adapter harness to reconnect the factory speaker wires to the new stereo’s matching outputs. Quick, but sound quality is limited by stock drivers.
- For adding aftermarket speakers: Run new speaker wiring from the head unit’s outputs to each new speaker location. Provides fuller sound, but requires wiring skill. Match colors appropriately.
- To add an external amp: Connect the amp’s RCA line level inputs to RCA line-level outputs on the new radio using adapter cables. Then connect speakers to the amp’s amplified outputs instead. Achieves loud, clean sound with bass.
So in short, use the head unit’s wiring harness appropriately to power either factory or new aftermarket car speakers – with or without external amps.
Now let’s condense everything into…
How to Install an Aftermarket Car Stereo in Ten Steps
We’ve covered a ton of conceptual topics. Now it’s time to get practical.
Here is an overview of installing an aftermarket car stereo from start to finish:
Step 1. Disconnect Battery
Safely disconnect the negative battery terminal before wiring. No need to shock yourself!
Step 2. Remove Factory Head Unit
Take out the old factory radio from its mounting cavity, plus its cage bracket and trim bezel if required.
Step 3: Install Wiring Harness Adapter
Securely plug the female side into the factory wiring plug left behind. Route male side to new head unit area.
Step 4. Mount New Head Unit
Secure the aftermarket stereo using proper installation brackets and factory hardware. Protect that investment!
Step 5. Connect Wiring Harness
Plug the head unit’s male wiring connector into the female side of the harness adapter cable. Ensure fully seated.
Step 6: Connect Accessories
Plug in antenna, amplifier remote turn-on, steering wheel controls etc to the new stereo.
Step 7. Install Trim Kit
Carefully reinstall dash trim bezels and mounting brackets onto new radio for clean OEM look.
Step 8: Program Head Unit
Configure car-specific settings on the new touchscreen for features like chimes and vehicle type.
Step 9. Test Operation
Reconnect battery, turn on ignition, and verify new stereo powers up correctly before reassembling dash.
Step 10. Reinstall Dash Components
Carefully reinstall any remaining trim pieces, knobs, and panels to complete tidy factory look.
And that’s it – you’ve officially installed your slick new aftermarket car stereo! But before riding off happily into the sunset, let’s cover…
FAQ and Troubleshooting For Aftermarket Car Stereo Installation
Like any electronics project, occasional issues can arise when replacing car radios. Here are solutions to common problems:
Question: No sound comes out of replacement stereo, but it powers on?
Answer: Likely loose wiring connection. Check harness adapters fully seated on both vehicle and head unit sides.
Question: Aftermarket radio doesn’t turn on at all?
Answer: Check yellow +12V constant and red ignition +12V wires are properly connected. Verify ground wire has good chassis contact.
Question: Touchscreen is unresponsive or glitching?
Answer: Ensure wiring harness adapter has a solid ground connection. Check head unit firmware and inputs are configured correctly.
Question: Power antenna no longer extends up?
Answer: Verify blue/white antenna turn-on lead is properly wired between head unit and motor antenna signal input.
So in summary, most issues stem from loose harness connections, lost ground points or incorrectly matched wires. Triple check all wiring before troubleshooting head unit itself.
Conclusion
In this guide you’ve learned insider tips for identifying and properly connecting car radio wires, reading wiring diagrams, finding vehicle-specific pinouts, installing harness adapters, bypassing factory amps, adding new speakers, as well as troubleshooting common problems when installing aftermarket car stereos.
With all the right accessories and knowledge combined, upgrading your ride’s sound system has never been easier. We hope these wiring details help you achieve audio bliss! Dive in there and start wrenching!

