Dual Battery Wiring Diagram
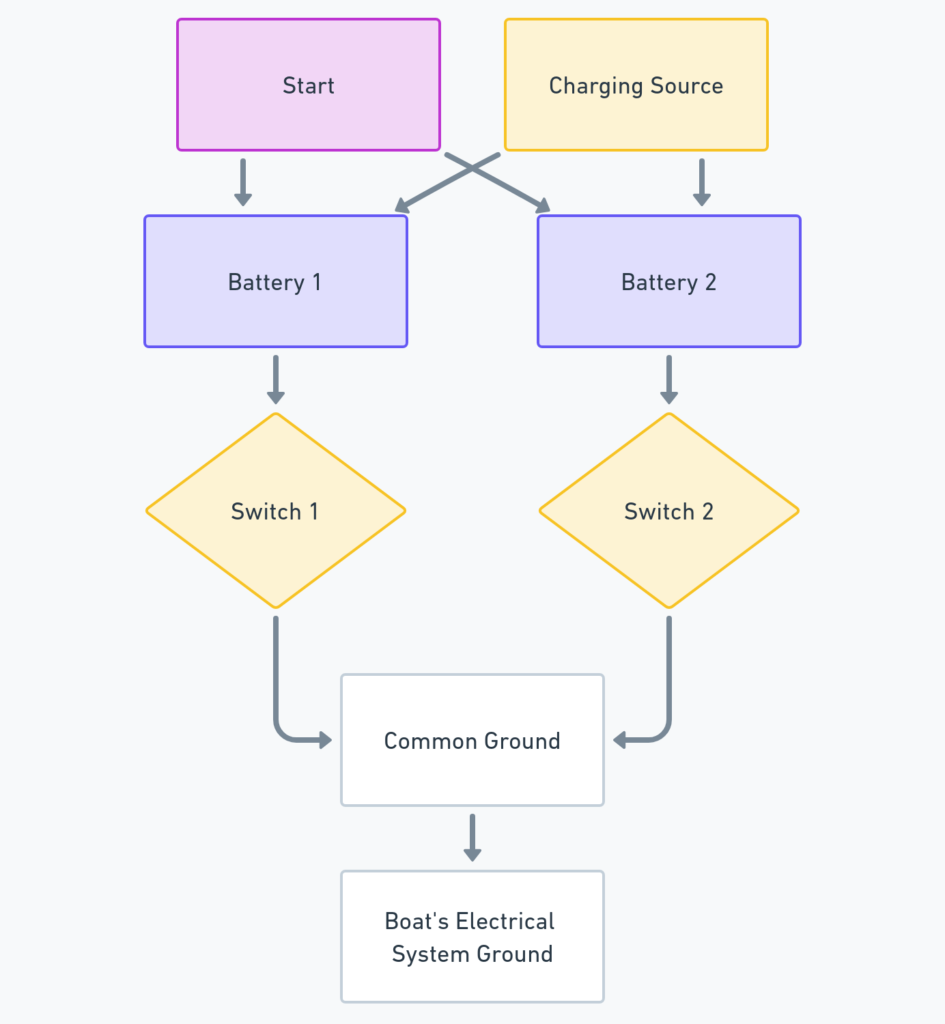
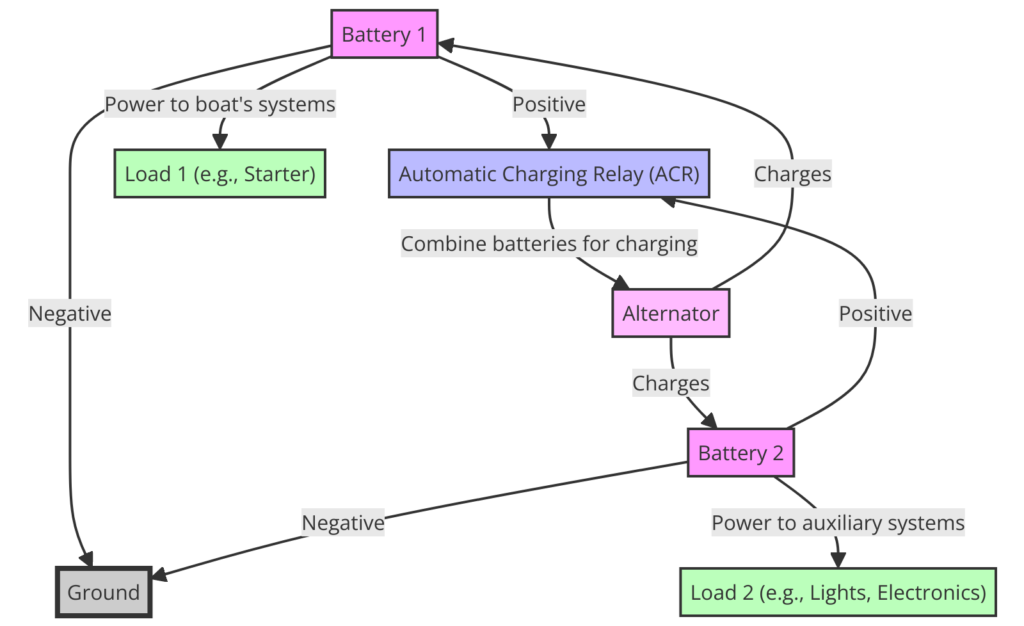
A dual battery wiring diagram is a visual representation that illustrates how to properly connect two battery banks in a boat’s electrical system. This setup allows you to isolate the cranking battery, which is dedicated to starting the engine, from the deep-cycle batteries used to power your boat’s accessories and electronics. By following a well-designed diagram, you can ensure efficient power distribution and extend the lifespan of your batteries.
What’s Included in a Dual Battery Wiring Diagram?
A typical dual battery wiring diagram for a boat will include the following components:
- Cranking battery (starting battery)
- Deep-cycle batteries (house batteries)
- Battery switch or battery isolator
- Alternator
- Fuse blocks or circuit breakers
- Wiring cables and connections
Dual Battery Wiring Diagrams
Diagram 1:

Diagram 2:

Diagram 3:

How to Read a Dual Battery Wiring Diagram
Reading a dual battery wiring diagram can seem daunting at first, but it’s quite straightforward once you understand the symbols and connections. Here’s a step-by-step guide:
- Identify the battery symbols: The cranking battery and deep-cycle batteries will be represented by distinct symbols.
- Locate the battery switch or isolator: This component is crucial for separating the two battery banks.
- Follow the wire connections: Trace the paths of the positive and negative cables from the batteries to the switch or isolator, and then to the various loads and charging sources.
- Note the fuse blocks or circuit breakers: These safety devices protect your electrical system from excessive current draw or short circuits.
- Check for grounding points: A proper grounding system is essential for safe operation and to prevent electrical interference.
Understanding Battery Isolators and Switches
One of the key components in a dual battery setup is the battery isolator or switch. This device allows you to charge both battery banks while preventing them from draining each other. There are two main types:
- Battery Isolator: An isolator is an intelligent device that automatically directs charging current to the appropriate battery bank based on voltage levels. It prevents current from flowing back to the alternator, protecting your batteries from being drained.
- Battery Switch: A battery switch is a manual control that allows you to select which battery bank powers your electrical loads. This option requires more user intervention but can be more cost-effective.
Benefits of a Dual Battery System
Installing a dual battery system in your boat offers several advantages:
- Prolongs the life of your cranking battery by dedicating it solely to starting the engine.
- Provides a reliable power source for your electronics, lights, and other accessories without draining the starting battery.
- Increases overall battery capacity, allowing you to run more electrical devices for longer periods.
- Offers redundancy in case one battery bank fails, ensuring you can still start the engine or power essential electronics.
Step-by-Step Installation Guide
While a detailed installation guide is beyond the scope of this article, here’s a high-level overview of the process:
- Determine the appropriate battery sizes and cable gauges for your boat’s electrical loads.
- Securely mount the batteries in a well-ventilated area, following proper battery installation guidelines.
- Install the battery isolator or switch, following the manufacturer’s instructions and your wiring diagram.
- Connect the positive and negative cables from the batteries to the isolator or switch, ensuring tight connections and proper cable routing.
- Connect the alternator output to the isolator or switch, allowing it to charge both battery banks.
- Install fuse blocks or circuit breakers to protect your electrical system.
- Connect the positive and negative cables from the isolator or switch to your boat’s electrical loads.
- Test the system and make any necessary adjustments.
Maintenance and Safety Considerations
Proper maintenance and safety practices are crucial when working with boat batteries and electrical systems. Here are some important tips:
- Regularly inspect cable connections for corrosion or looseness and clean or tighten as needed.
- Check battery fluid levels (if applicable) and top up with distilled water when necessary.
- Ensure proper ventilation in the battery compartment to prevent the buildup of explosive hydrogen gas.
- Wear appropriate personal protective equipment, such as safety glasses and insulated gloves, when working with batteries.
- Disconnect the negative battery terminal before performing any electrical work to prevent short circuits.
By following a well-designed dual battery wiring diagram and adhering to best practices, you can enjoy the benefits of a reliable and efficient electrical system on your boat. Remember, proper installation and maintenance are essential for ensuring the safety and longevity of your batteries and electrical components.
