How To 3 Way Switch Wiring Diagram? A Complete Guide
Have you ever walked into a room wanting to turn on a light and been frustrated that the light switch was in the “wrong” spot? Ever wondered if there was a way to control a single light from two different switches? If so, installing a 3-way light switch may be the ideal solution for you.
A 3-way switch allows you to control a light fixture from two separate locations, like at each end of a hallway or large room. This gives you much more flexibility and convenience in your home lighting.
While these 3-way switch setups are incredibly useful, many DIYers find them intimidating to install due to the extra wiring involved. But with some basic information, a good wiring diagram, and safe wiring practices, you can successfully wire 3-way switches in your home.
In this step-by-step guide, we’ll teach you everything you need to know. We’ll cover:
- What a 3-way switch is and how it differs from a standard single-pole switch
- The right materials and tools to complete your 3-way switch install
- Step-by-step instructions for safely wiring two 3-way switches
- A wiring diagram to use as a visual guide
- Troubleshooting tips for common 3-way switch problems
So read on to learn how to wire a 3-way switch, and take control over your home lighting!
What Is a 3-Way Switch?

Before jumping into the specifics of wiring, it helps to understand exactly what a 3-way switch is and how it functions differently than the standard single-pole switches you’re likely already familiar with.
What Is a Single-Pole Switch?
A single-pole switch has two terminals and controls lights or other loads from only one location. This is the common light switch installed in most basic home electrical configurations. Inside the switch, a basic on/off mechanism connects or disconnects the hot current’s path to the light when you flip the lever.
Single-pole switches are simple, requiring just a hot wire and a switched hot wire connected to the light fixture.
How Do 3-Way Switches Work?
A 3-way switch also connects and disconnects a hot wire and light fixture hot wire to turn a light on and off. However, two 3-way switches control the same light from two different locations.
Each 3-way switch has three terminals:
- Common terminal
- First traveler terminal
- Second traveler terminal
The common terminal connects to the hot wire from the light fixture itself. It’s called “common” because it’s the one common connection across both 3-way switches.
The two traveler terminals connect to the traveler wires that allow the dual control locations to communicate. One traveler wire runs from the first switch’s first traveler terminal to the second switch’s second traveler terminal. The other traveler runs between the remaining traveler terminals.
Flipping either 3-way switch then connects or disconnects the light between the common terminal and traveler wires. Both switches must be wired properly to the traveler wires and light common for this system to work.
3 Way Switch Wiring Diagrams
Diagram 1
Diagram 2

Diagram 3

Diagram 3

Now let’s look at how to wire these handy 3-way switches into your home.
Step-by-Step Guide to Wiring 3-Way Switches
When embarking on any electrical project, safety should always be your top concern. Take the following safety precautions when wiring a 3-way switch:
- Turn off main power at the circuit breaker before starting any wiring
- Use caution and wear personal protective equipment for safety
- Double-check that power is off using a non-contact voltage tester
- Carefully pre-plan your wiring connections
- Have your wiring inspected once complete before turning power back on
Follow these steps to safely install and connect 3-way switch wiring.
Gather the Required Materials and Tools
You’ll need the following equipment for this project:
- Two 3-way switches (plus any additional switches if expanding your existing 3-way system)
- Light fixture to be controlled
- Boxes to house each switch, if installing new switches
- Required wiring length of NM (nonmetallic) 14/3 cable with black, white, copper ground wires
- Screwdrivers
- Wire strippers
- Electrical tape
- Wire nuts to connect wires
Turn Off Power and Prepare Your Switch Boxes
Start by using the correct circuit breaker to turn off power to the switch and light fixture locations.
Then, you can prepare the switch boxes if installing new rather than replacing existing switches:
- Mount switch boxes at appropriate height and location code for your region
- Feed wires into boxes leaving 8 inches of wire to make connections
If replacing existing switches, remove the old switches and disconnect all wires.
Identify and Connect the Traveler Wires Between Switches
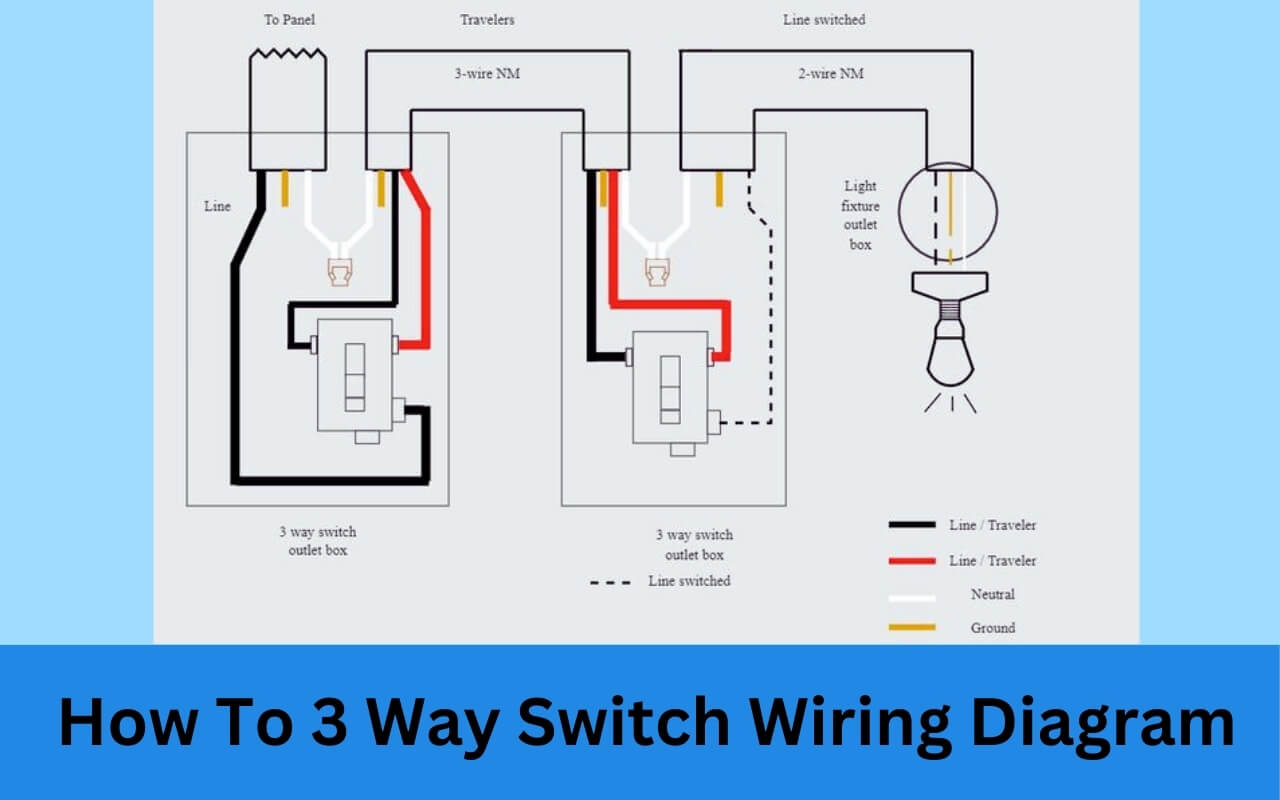
The traveler wires communicate between the switches to control the light. They connect diagonally between the traveler terminals, as shown in the wiring diagram later in this article.
You can use any wires as travelers in 12/2 cable, but it’s common and good practice to use the red and black. Since you have an extra wire in 14/3 cable beyond what 12/2 offers, it gives you flexibility:
- Black and red for travelers
- White for neutral
- Ground wire remains bare or green
Connect one traveler wire from the first switch’s first traveler terminal to the second switch’s opposite traveler terminal. Then connect the second traveler between the remaining traveler terminals.
Twist matching traveler wires together with wire nuts, following manufacturer specifications so they are secure.
Connect the Light Fixture Hot, Neutral, and Ground Wires
The key to remember when wiring 3-way switches is that the light fixture hot connects to the common terminal on one switch. The hot source wire connects to the common on the other.
- Identify the hot source wire in the box
- Connect the source hot to the common terminal on one 3-way switch
- Connect the light fixture hot (typically black) to the common terminal on the other switch
The neutral from the light fixture connects to the neutral coming from the panel, joined together with a wire nut inside the switch box.
Finally, connect all ground wires (including fixture ground, switches’ ground terminals, and any cable grounds).
Wrap ground wire connections with electrical tape for safety.
Finish and Check Your Work
Double check all switch wiring connections to be sure wires are securely fastened.
Close up all switch boxes, mounting the switches and outlets appropriately. Restore power at the breaker and test light functionality from both switch locations.
If the light works as expected, you’ve successfully wired your 3-way switch!
3-Way Switch Wiring Diagram
Many people learn best using visuals. Refer to this 3-way switch wiring diagram as a helpful guide while wiring:
As you can see, with a main power source coming into the circuit, two 3-way switches control the power flow to the light fixture.
Following the red and black traveler wires, you can see how they criss-cross between opposite traveler terminals on each switch.
The lamp hot wire connects to the common terminal on just one switch, while the hot from the panel connects to the other switch common terminal.
Use this diagram as a reference while wiring your switches to ensure all wires terminate at the proper locations.
Troubleshooting 3-Way Switch Problems
Don’t panic if your newly wired 3-way switches don’t work immediately after installation. Recheck connections against the diagram to spot any wiring mistakes.
Here are some of the most common 3-way issues and their solutions:
Problem: Light doesn’t turn on from either switch
Solution: Check power and light wires are connected to common terminal on one of the switches. Verify hot wire connects to the other switch common terminal.
Problem: Light only works from one switch location
Solution: Check that traveler wires connect between correct traveler terminals between switches. Verify traveler from first switch goes to opposite traveler terminal on second switch.
Problem: Light turns off and on unexpectedly
Solution: Traveler wires may be touching and shorting. Check they connect solidly via terminals with no exposed copper touching other terminals or box.
Problem: Light flickers or doesn’t come on fully
Solution: Connection may be faulty. Check wires are stripped properly and securely connected with tight wire nuts.
With good connections and the correct 3-way switch wiring, you can troubleshoot other light issues as you would any standard light fixture.
Conclusion and Summary
While wiring 3-way switches takes more care and attention than single-pole installations, the work pays dividends through added home lighting flexibility.
Following basic 3-way switch wiring standards, diagrams, and best practices helps ensure success.
To recap key tips:
- Understand that 3-way switches have travelers between terminals allowing control from 2 locations
- Use 14/3 cable even for older homes lacking ground wire
- Take precautions working with electrical systems
- Connect traveler wires diagonally between switches
- Join the light hot wire to common terminal on one switch
- Join hot wire from panel to common on the other switch
- Adhere to wiring diagram for proper terminal connections
With the information in this guide you now have the knowledge to wire 3-way switches. Take your time, follow safety procedures, and use the 3-way switch wiring diagram as a helpful visual reference.
You’ll soon enjoy the convenience of controlling lights from multiple locations in your home. No more fumbling for switches in the dark!
Let us know if you have any 3-way questions as you begin your lighting project!


